KVM hypervisor install on virtualization server: BIOS, VT-x, VT-d, Debian bootable USB
A video series on installing the KVM (Kernel Virtual Machine) hypervisor based on Debian Linux to a cheap virtualization server made out of gamer and PC components. Here we look at the setup what I currently have put together, so it is more easy to follow the steps I am taking.
First one should activate and enable the Intel® VT-x (AMD-v) and VT-d (AMD IOMMU) support from the BIOS of the motherboard. Each BIOS will look different, so here I just present the settings for a Gigabyte 990FXA-UD5 and for an ASrock 970 Extreme 3 motherboard for AMD® CPUs.
To boot from USB stick, also the boot device priority need to be set up (forgot to mention it in the video) and the ‘Boot Mode’ set to Legacy, since most hypervisors running on virtualization servers are not using UEFI. To initialize the third party boot ROMs (for example on RAID cards, InfiniBand or other network cards) one need to set up the boot ROM also to Legacy mode. Even so, my motherboard does not allow me to boot from iSCSI or even via PXE from the network if I am not using the onboard Realtek RTL8111 Gigabit network card for PXE. The gamer oriented motherboards also do not have SR-IOV support. For such advanced feautures one must buy a server grade motherboard.
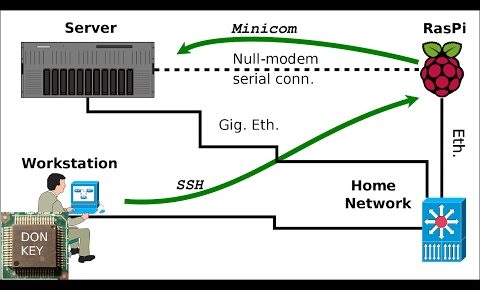
Due to the lack of IPMI the software installation will be performed over a serial console. I connect to the serial port of the server through a null-modem cable and a Raspberry Pi via Minicom.
The storage for the virtual machines will be a ZFS RAIDZ-1 array from four mechanical disks, and two SSDs as ZIL and L2ARC, this is why I have to save one SATA port and use a USB stick for the system disk for the underlying Debian 8.7 Jessy I will be using a 32GB USB stick.
Also, as installation media, here a bootable USB stick is being prepared using the Debian netinstall ISO, and the MD5 sum of the ISO checked to make sure that the file was intact.
Link and command line history for bootable USB stick
================
https://cdimage.debian.org/debian-cd/current/amd64/iso-cd/
mkdir DEBIAN
cd DEBIAN
wget -c https://cdimage.debian.org/debian-cd/current/amd64/iso-cd/debian-8.7.1-amd64-netinst.iso
wget -c https://cdimage.debian.org/debian-cd/current/amd64/iso-cd/MD5SUMS
grep debian-8.7.1-amd64-netinst.iso MD5SUMS RightBacketHere debian-8.7.1-amd64-netinst.md5
YT does not allow actual brackets in the description, annoying…
md5sum -c debian-8.7.1-amd64-netinst.md5
Transform into the root user
lsblk
Plug in the USB stick
lsblk
Make sure that you get the RIGHT device name for your USB!!!
dd if=debian-8.7.1-amd64-netinst.iso of=/dev/sdb bs=1M
sync
The actual software installation and KVM setup will be presented in the next videos.
